Thursday, August 21, 2014

It's That Time of Year Again

It's that time of year again and hunting season is upon us. That means I've got to attempt to repair a small split in my dad's old 12 gauge semi automatic shotgun and get back on the shooting range to practice for deer hunting.  I don't particularly enjoy target shooting with my Remington 700 BDL .270. It kicks, it's deafening, and it enjoys expensive ammo. That's pretty much why I purchased a 10/22 so that I could practice shooting without selling a kidney.

The last I can recall, I was feeding it Hornady 130 grain SST type ammo and it was grouping about .5 MOA. I still have a box of Remington Accutip which uses the Hornady SST bullet, and I suspect it's made at Hornady's plant, but I plan on trying to purchase some more Hornady ammo and Winchester ballistic silvertip to see what kind of groupings I get.  But I still need to take it to the range to see if I need to make any scope adjustments before hunting.

I recall the different ammo I've tried over the years with much umbrage. Winchester X, Remington Core-lokt, a South African imported type that was designed for thin skinned African game and utilized an all lead bullet and slightly reduced powder charge, Remington managed recoil, Federal Fusion...they all stunk to varying degrees. The Federal Fusion stunk the worst...I was managing something along the lines of 4 to 5 inch groups at 100 yards, and more often than not the third bullet would get thrown will nilly over the paper. But the Remington Core-lokt was somewhat decent and consistently averaged 2" groupings at 100 yards.

So what does this mean? Nothing, really. Just that Hornady SST bullets are very favorable to my gun for whatever reason and they're effective. Just looking on the internet for a particular brand of ammo will yield two camps, those that state "I was able to group 10 shots within a gnat's hair at 500 yards" and those that rebut "the results of this ammo make me thing my rifle sneezed all its bullets out over the target."

Right now I'm reading Jack O' Connor's book "The Hunting Rifle" and I'm curious as to what he says about bullet types. 

Tuesday, August 5, 2014

Tuesday, July 1, 2014

Sideboard From Rough to Smooth

I have no clue where the idea came from to build a sideboard. I think it was just the fact that we had more space than ever in our dining room and it looked fairly barren, coupled with the fact that we seemed to have an endless supply of dishes, silverware, stemware, and tablecloths. I'd purchased "Furniture in the Southern Style" almost a year ago to this date, and pored over the photos, drawings, and exploded diagrams of the different pieces from the MESDA collection. The one piece that I kept leafing back to was a simple three drawer sideboard with a back splash, some corbels around the front legs, and banding, constructed using mortise and tenon joinery.

I drew a design based off it, but stripped out the back splash, the corbels since they looked really clunky, and the banding because I wasn't sure how it would look against cherry (the original piece's primary wood is black walnut native to the southern USA. The secondary wood is southern yellow pine AKA longleaf pine).

I bought 47 bf of cherry and 10 bf of tulip poplar for the sideboard, based on calculating the bf requirements for the cutlist given in the MESDA book and then adding a little extra just in case. As it turns out, this was actually a little bit too much, and I wound up making a coffee table with the top and rails made out of the clearest and straightest cherry and using some left over white ash for the legs. I asked the guy who was selling me the lumber if he possibly had any leg blanks in the rough.
"Leg blanks? How thick do you need it?"
"Around 2 inches rough"
"No...I got a 10 foot slab of  cherry 3 thick and 10 wide. Will that do it?"

And so I purchased a huge ass slab of wood that will give me hernia problems when I hit 40.

The first thing I did when I got the lumber was to pick out boards that were clear of knots, straight grained, and mostly flat. Unfortunately there were very few boards like that. What boards I did pick, I cut out drawer fronts, sides, and tops from. But because I used most of the flat and clear pieces of cherry for the coffee table I built, I had to go back to the lumber stacks and pick out some pretty crazy looking pieces of cherry that had some serious cupping.

The Legs

After I got my parts cut out, I started work on the legs. I'm not sure if you've had the pleasure of ripping 10 feet of 3 inch thick cherry, but it's the kind of pleasure that you want to reserve solely for a tablesaw or bandsaw. And because of the small, small size of my shop, I had neither. Just a lowly 700mm bowsaw with a 5 tpi web. After I cut the leg blanks out of the slab, I started work on them.

After mortising

Tapered


The tapers were done by using a drawknife to hog off waste. For something like this, though, there was a lot of material to take off. A hatchet or ax may have been a better choice. Mortises were cut with a 3/8" Narex mortising chisel which was a godsend.  It's unique in that it's trapezoidal in cross section which allows you to better steer the chisel which is exactly what I needed in the wild figured cherry. The case sides are fairly wide, and more than likely the original side was one piece of black walnut, so to accommodate wood movement, I chopped the top mortise as the fitted mortise and left the bottom two a little longer than needed for their tenons and left them unglued. The reason is simple: if the wood attempts to contract, it'll be able to shrink on its lower half, and if it attempts to expand, it can do so on its lower half. Had I fitted the tenons tightly to the mortises and glued all three, when the side would try to expand or contract, it would split the sides.

The Sides and Back

After some serious handplaning, the case sides wound up being in the neighborhood of 12 inches wide. I used my dinky Stanley rabbet plane (the type with a one arm fence and depth adjuster that uses a lever instead of a nut and yoke) to cut rabbets to the proper tenon thickness, and then cut out the tenons from the one long rabbeted edge. Let's just say the Stanley leaves a lot to be desired when it comes to cutting rabbets. I now have my eye on the Lee Valley Veritas model. The back was done exactly the same way, but I mortised it for the drawer runners.


The Front Rails

The front rails were a nightmare. By this time, I was running fairly low on cherry. What were supposed to be the rails for the sideboard were now the rails for the coffee table. So I had to use some seriously twisted wood with crazy grain pattern. Grain run out, sapwood dispersed throughout, reversal, grain diving down, coming back up, undulating...it had it all!


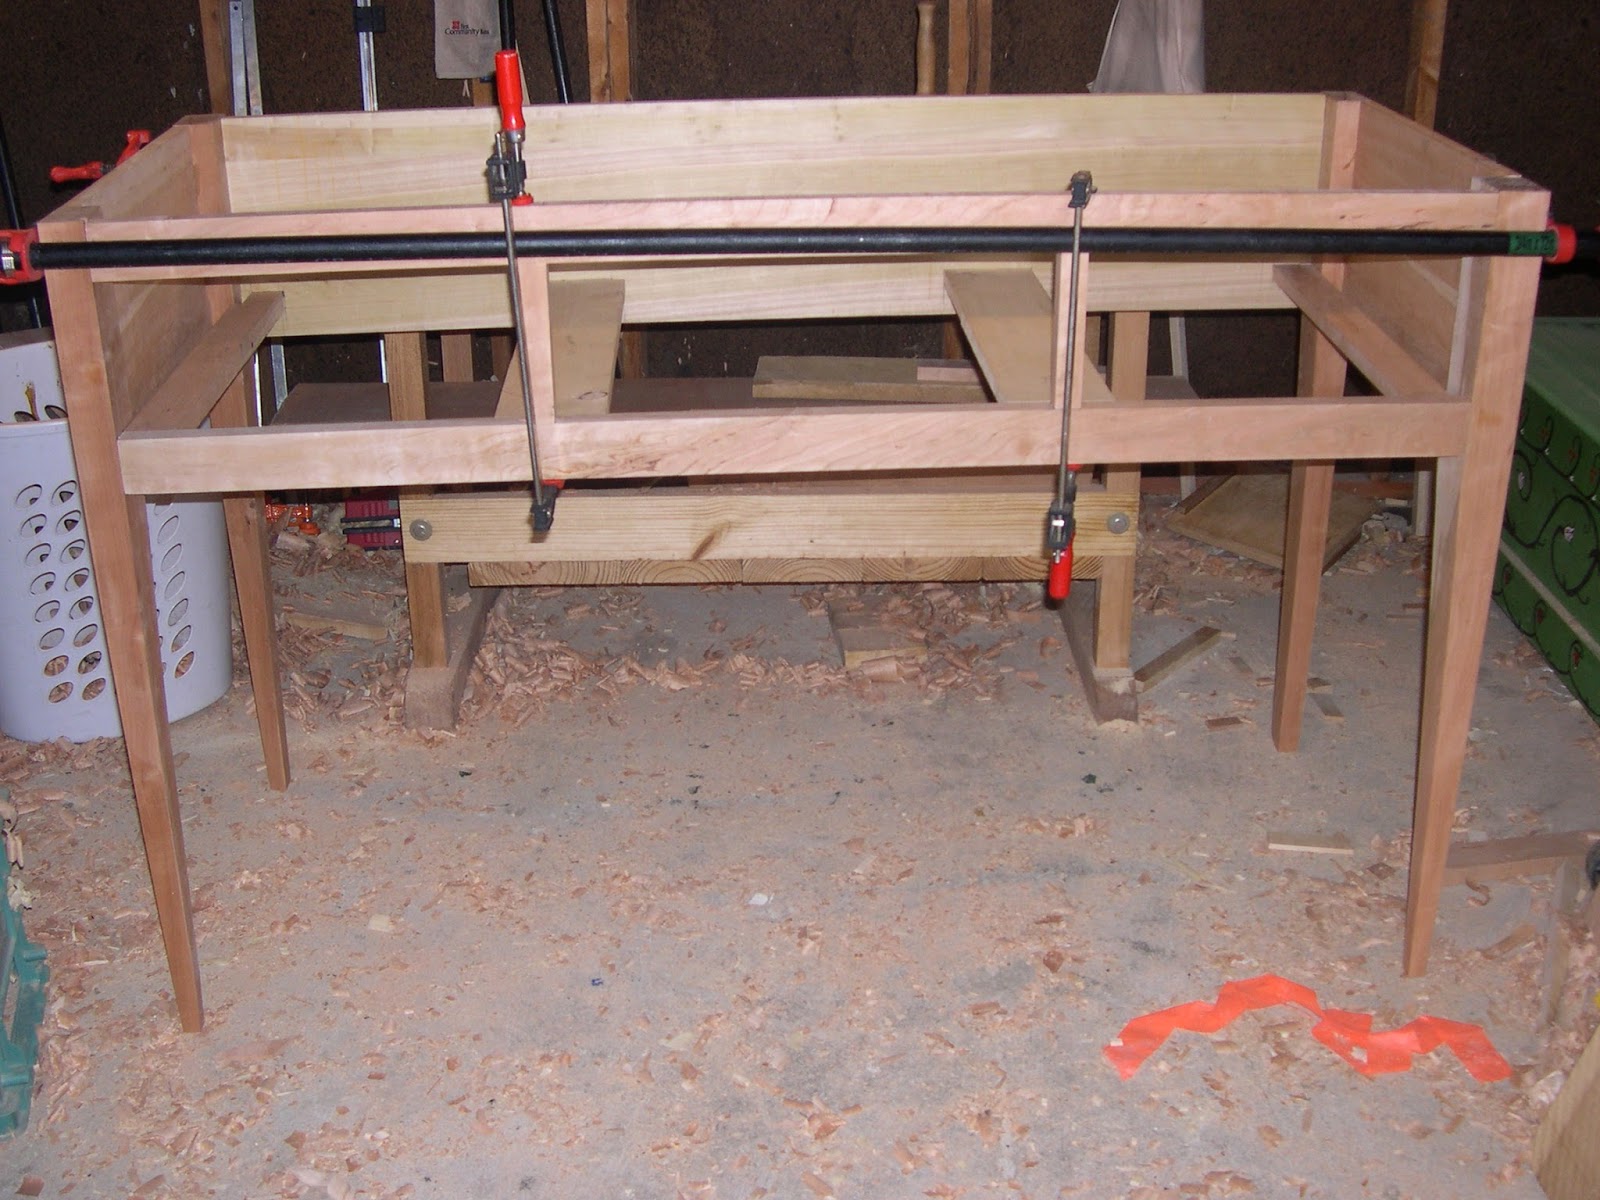
Dry fitting to check the mortise and tenon

Dry fit to test for square on the case front

The Top

Because my best pieces went to the cherry coffee table, I settled for some lesser boards that had a lot of sapwood and a ton of warping. I did my best to flatten each piece, but after an hour I threw up my hands, and glued the three boards together. I think the real trick to getting flat panels from rough boards like this is to try and joint the edges so that the faces are approximately coplaner, and then roughly flatten the back face, and get the top dead flat and smooth from tear out. But now I know.


The Drawer Runners

This part wasn't too bad. After dry fitting the front rails I mortised the lower rail and cut tenons on some cherry off cuts and pine for the drawer runners. Looking back, it would've been much better to have had the side drawer runners as wide as possible so that they mated with the inside of the case sides. That would've made putting in drawer guides a cake walk, as I could've glued strips on the wide runner so that they butted up against the drawer. Because as of right now, my two outside drawers have no guides on their outer edges since their outer edges line up perfectly with the outer edges of the drawer runners.

At this point I should've said, "Hey wait a second..."
The Glue Up

The glue up is the most exciting time of any project. It's the time when you're nearing completion, and it's also the time you'll most likely pay if you haven't done a dry fit, especially with larger pieces. After a particularly exciting glue up involving an out of square stool, a lone too long tenon for its mortise, a paring chisel, and my thumb, I always do dry fits to rehearse the best way to put the piece together and to find any mistakes while I can still fix them.


The Drawers

The drawers were constructed using half blind dovetails in the front and through dovetails in the back. I remember this being somewhat routine, although I wish I'd practiced dovetailing a lot more before jumping into the half-blinds. While I was chopping out the waste for the center drawer front, a large piece of cherry cracked out of the back despite my best efforts to use as little force as possible to chop the waste out and to keep the back well supported to prevent this from happening.  But happen it did. I cut a triangular patch that was larger than the damage out of the drawer front, and cut a piece of veneer to cover it. I clearly hadn't had enough sleep the night before, since you should always cut the patch of veneer first, and then scribe the shape of the patch over the damaged area for a better fit.


The Finish

I finished the coffee table first before getting into the heavy work on this piece. But the thing that irritated me is that the garnet shellac over the cherry coffee table top looked really...orange. Not at all what I expected. I knew I'd have to stain the whole sideboard since all of the boards I'd used to build the top had cream colored sapwood in it, and the front rails were hideous with sapwood and crazy mineral streaks. I purchased red aniline dye from Lee Valley and applied it until I got the color mostly evened out. The top was the first part that I finished, using the French polishing technique and the same garnet shellac. The drawer fronts got the same treatment, and the rest was brushed with about 4 coats of garnet shellac. I used a card scraper to level the finish on the front legs, rails, and sides, and French polished on a small amount of shellac until I got the sheen I was looking for.  The hardware was bought from Lee Valley.


Sideboard finished


Aaaand we're done. I finished the sides by humping the whole case minus the top out to my back porch with a drop cloth laid down and using a brush to put on three layers of garnet shellac. After three hours of letting it dry, I used a card scraper to scrape flat the surface on the rails, stiles, the fronts of the legs and the case sides, and then charged a pad and polished on shellac until my pad began dragging slightly (approx. two coats). The end result looks great. It's not a highly polished surface compared to the drawer fronts, but it's got a great sheen to it, it's smooth, and the grain is partially filled, giving it a little bit of texture.
I debated about refinishing the top. Although I had French polished it, I hadn't done quite enough bodying sessions, and the shellac had shrunk back into the pores which also highlighted low spots in the top. This set it apart from the high gloss drawer fronts, and not for the better.
I'd also run out of BT&C dewaxed garnet shellac. I could wait for two whole days for my other batch of orange shellac to dissolve and then decant the shellac from the wax, or I could press my luck and try to rub out the finish to see if I could get a better sheen from it.
I haven't had much success rubbing shellac out with pumice and rottenstone. Part of me wonders if the shellac was on its last legs (I French polished the center drawer front and let it sit for 3 days to allow the shellac to fully cure. But when I clamped it to my bench top to install the drawer pull, the shellac was still too soft and cloth indentations were left in it. On the other hand, we had some pretty intense heat that week in the upper 90's and my shop doesn't have A/C). Whatever the reason, I took a chance and used just the rottenstone to polish it up. And it worked great! Over time I expect it to acquire a more semi-gloss look after dishes and plates slowly scratch the surface.
I'll do another blog post detailing the build from start to finish and lessons learned along the way.

Thursday, June 26, 2014

Sideboard is complete...now it needs to be finished.

Last I left off, the sideboard had its center drawer with a huge piece of wood missing from it, and I didn't have a great idea how to fix it. What I came up with was sawing up pieces of veneer from an unruly grained 4 inch wide piece of cherry and then using that to fill the gap. Clearly I was tired, since I routed out the recess for the patch first, and then cut the patch to fit.
Never do this. It's much easier to cut the patch, scribe the recess around the patch, and then route the recess. You can do it the opposite way, but then you have to mess around with tracing paper and attaching it to the patch. It's a pain.

It doesn't fill the broken wood exactly, but it's enough to prevent your eye constantly returning to that one spot.
Finishing this drawer front gave me the most grief. I french polished the drawers, but for this one I held off on finishing it until I got the patch in place. The heat during the week was intense, and actually caused the shellac to dry too quickly on this drawer front to prevent the oil used in lubricating the pad to rise to the top of the finish. What happened instead is that it coalesced into large droplets that formed scabs and numerous bumps on the finish.  After discovering this, I let the drawer sit for another week, in case the oil was still trapped in the finish and would continue moving around, and then used a card scraper to flatten the surface.
With the flat surface, I put on two coats of garnet shellac and allowed them to fully dry for a few days before scraping the surface flat again, and rubbing the finish out.
I put an antique finished (satin-like) federal style pulls on the drawers and they're resting comfortably in the case. All to do right now is to finish the sideboard case and to attach the top.

Tuesday, May 13, 2014

Sideboard Drawers

Over the weekend I spent a large amount of time prepping cherry for drawer fronts, cutting pine stock for sides and backs, and then lots of dovetail joinery. I've got 3 drawers built and the only thing left for me to do is to cut out bottoms for them, and to glue up the drawers together. I'm waiting for a lull in the dogs' napping schedules where I can sneak out to my shop and see how well the drawers fit the sideboard. So far, fingers crossed that it's a little snug.
This cherry that I bought is interesting. In its tamer state, it's a hardwood that's nice to plane and cut joinery on. But most of the tamer boards that I had set aside went to the coffee table top and the sideboard top. The drawers were mostly offcuts from some wider boards or boards that were so warped that I had to cut out entire middle sections. If I'd left those sections in and planed it flat, the thickness would probably have gone from 3/4" to about 1/4". They were that bowed.
The great thing about using these wild wood cherry pieces is that it stands out for the drawer fronts. Grain that twists and dives in an undulating pattern, pieces that have large bullseye patterns in corners where a branch had started growing. The problem is that this figure doesn't lend very well to structural integrity.
The first drawer front I gave up on trying to get the face of the drawer flat. Right now it's just flattish. But the back is dead flat and that's what I've been using as a reference, so it works out great. The second drawer front had rings on one of the corners. Cherry's brittle to begin with, so when I was cutting the half blind dovetails I gave myself some extra room in case anything cracked, and had a tail depth that was a little over half the thickness of the board.
That wasn't thick enough.
You can imagine my surprise (and the swearing) when I finished chopping the tail waste out and heard a large "CRACK." I turned the piece over and watched a large piece of cherry crumble apart, leaving a large void that would show where the tail is. Not quite the look to go for when you're doing half blind dovetails.
Tomorrow I'll cut the drawer bottoms and get everything fitted.
And I'll spend a larger amount of time trying to figure out how to inlay a piece of cherry into that crack.

Sunday, March 2, 2014

Sideboard update

Things are going rather slowly. I'm swamped with work, and the only thing standing between me and a completed sideboard is about 10% more work. The only things I have left to do are to make and fit the drawers and attach the top, and then start staining and finishing the whole thing. With the way things are going right now, I'll probably get most if not all of it done over the following week.
However, Lara and I debated about what we should make next. I pitched her the idea of a drop leaf table (also known as a Pembroke table) that would be small enough for four and big enough for two to eat breakfast on. Her eyes lit up over that. So as of right now, I'm waiting on receipt of 30 bf of soft maple to get started on my next project.
 
Creative Commons License
This work is licensed under a Creative Commons Attribution 3.0 Unported License.